Spider-Man has been swinging into the hearts of fans for generations, making him a timeless favorite for themed parties, especially birthdays. A Spider-Man cake isn’t just a dessert; it’s a centerpiece that can elevate your celebration to superhero status. Whether you’re crafting a cake for a child who adores Spidey or an adult who grew up with him, this guide will help you create a Spider-Man cake that wows guests and tastes as good as it looks.
In this comprehensive guide, we’ll explore everything from choosing the perfect design to the best decorating techniques. You’ll learn about different cake styles, from the classic Spider-Man face to elaborate 3D designs. Whether you’re a baking novice or an experienced cake artist, these step-by-step instructions will make the process easy and fun.
Ready to spin some creativity and bake a cake that Peter Parker himself would be proud of? Let’s dive in!

Planning Your Spider-Man Cake Design
Creating a Spider-Man cake starts with thoughtful planning. From selecting the right design to gathering materials, each decision shapes the final masterpiece. This section will guide you through the essential planning steps to ensure your cake-making process is seamless and enjoyable.
Choosing a Spider-Man Cake Theme
One of the first steps in creating a Spider-Man cake is choosing the design. Here are some popular options:
- Spider-Man Face Cake: A classic choice featuring Spider-Man’s mask, ideal for beginners or those looking for a clean, simple design.
- Spider-Web Pattern Cake: A versatile option with intricate web designs and optional Spider-Man logos.
- 3D Spider-Man Bust Cake: Perfect for advanced decorators aiming for a show-stopping centerpiece.
- Comic Book-Inspired Cake: Includes vibrant colors, comic-style patterns, and action words like “Pow!” and “Zap!”.
When deciding on a design, consider your skill level, the tools you have, and the preferences of the person the cake is for.
Spider-Man Cake Tools and Materials
Before you begin, Here’s a checklist to get you started:
Baking Essentials
- Mixing bowls and spoons
- Measuring cups and spoons
- Cake pans (round, square, or specialty shapes)
- Spatulas and offset spatulas
Decorating Tools
- Piping bags with various tips
- Fondant rolling pin and smoothers
- Food coloring (red, black, blue, and white for Spider-Man’s colors)
- Stencils or printable templates for Spider-Man designs
Optional Add-Ons
- Edible glitter or shimmer dust for a polished look
- Spider-Man-themed toppers or figurines
- Cake boards for stability
Selecting a Cake Base
The foundation of your Spider-Man cake is the cake base itself. Here’s what to consider:
Flavor Options
- Classic Vanilla or Chocolate: Universally loved and pairs well with any frosting.
- Red Velvet: Matches Spider-Man’s iconic red suit and adds a pop of color.
- Marble Cake: A fun mix of chocolate and vanilla for added visual interest.
Number of Layers
- For a simple Spider-Man face design, a two-layer cake is sufficient.
- For 3D cakes, opt for at least three layers to carve and sculpt shapes.
Custom Shapes
- Use specialty pans like oval or mask-shaped pans for Spider-Man’s face.
- Cut and stack rectangular layers for a comic book design or sculpt a bust shape.
Planning the perfect Spider-Man cake sets the stage for a smooth baking and decorating experience. With a clear design in mind, the right tools, and a delicious base, you’re ready to bring your superhero creation to life.
Preparing the Cake
Once your design and materials are ready, it’s time to prepare the foundation of your Spider-Man cake. A well-made cake ensures a sturdy base for decorating and guarantees a delicious treat for your guests. This section will guide you through every step, from making the batter to assembling the layers.
Making the Batter
The first step in preparing your cake is to create a flavorful and fluffy batter. Here’s how you can get started:
Ingredients for a Basic Cake
- 2 ½ cups all-purpose flour
- 2 ½ teaspoons baking powder
- ½ teaspoon salt
- 1 cup unsalted butter, softened
- 2 cups granulated sugar
- 4 large eggs
- 1 tablespoon vanilla extract
- 1 cup whole milk
Baking the Cake Layers
Once your batter is ready, it’s time to bake the cake layers. Proper baking techniques ensure an even rise and a perfect texture.
Steps to Bake the Cake
- Divide Batter: Pour the batter evenly into the prepared cake pans. Use a kitchen scale for precise layers.
- Bake: Place the pans in the oven and bake for 25-30 minutes, or until a toothpick inserted in the center comes out clean.
- Cool the Cakes: Allow them to cool completely before assembly.
Assembling the Layers
Layer assembly is crucial for stability, especially for multi-layer or 3D Spider-Man cakes. Follow these tips to stack your cake like a pro:
Steps to Assemble
- Level the Layers: Use a serrated knife or cake leveler to trim the tops of the cakes, creating flat surfaces.
- Apply the Crumb Coat: Spread a thin layer of frosting around the entire cake to trap crumbs. Chill for 30 minutes.
- Stack with Precision: Place one layer on your cake board, apply an even layer of frosting, and repeat with the remaining layers. Ensure alignment for a professional finish.
Pro Tips for Preparation
- If your cake layers are delicate, refrigerate them before assembly for easier handling.
- Use a turntable to achieve smooth and even frosting application.
With your cake layers baked, cooled, and assembled, you’re ready to move on to the most exciting part—decorating your Spider-Man cake!
Decorating the Spider-Man Cake
Decorating your Spider-Man cake is where creativity and fun take center stage. Whether you’re aiming for a classic Spider-Man face or an elaborate 3D bust, this step will help you transform your cake into a superhero masterpiece.
Choosing the Right Frosting
The type of frosting you choose sets the foundation for your cake’s decoration.
Buttercream Frosting
- Perfect for smooth finishes and vibrant colors.
- Easy to pipe spider webs and other intricate designs.
Fondant
- Ideal for sculpting and creating a polished, professional look.
- Allows for a more detailed Spider-Man mask or logo.
Recipe for Buttercream Frosting
- 1 cup unsalted butter (softened)
- 4 cups powdered sugar
- 2-3 tablespoons milk or cream
- 1 teaspoon vanilla extract
- Beat butter until creamy.
- Add milk and vanilla extract, and beat until smooth.
Drawing Spider-Man’s Face or Emblem
One of the most iconic designs is Spider-Man’s mask. Here’s how to achieve it:
Using Stencils
- Print or draw a Spider-Man mask template on paper.
- Place the stencil on top of the cake and lightly trace the outline with a toothpick.
Freehand Designs
- Start by frosting the cake with a base layer of red buttercream or fondant.
- Use black food coloring in a piping bag with a fine tip to outline the mask and create the web pattern.
- Fill the eye areas with white frosting or fondant.
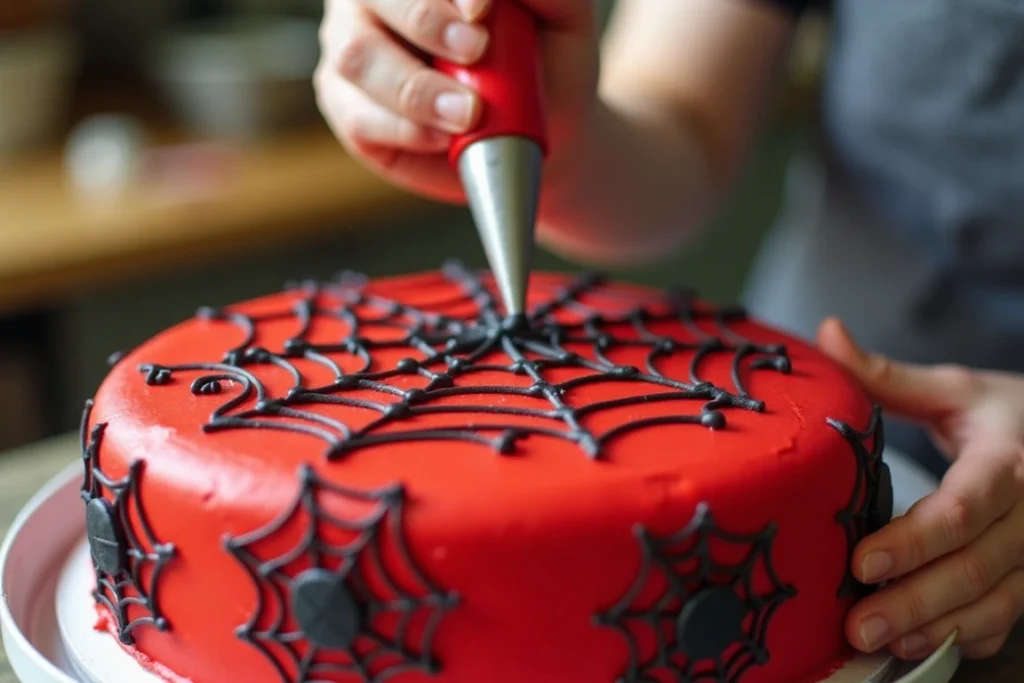
Adding Spider-Web Details
Spider webs are essential for a Spider-Man theme. Here are techniques to perfect them:
Using Piping Bags
- Fill a piping bag with black frosting and fit it with a small round tip.
- Start from the center of the cake and pipe outward in concentric circles.
- Connect the circles with curved lines to form the web pattern.
Alternative Methods
- For a rustic look, use melted chocolate or icing pens to draw the web directly onto the frosting.
- Dust the cake with edible glitter for a sparkling finish.
Incorporating Edible Decorations
Add an extra layer of excitement with edible decorations:
- Spider-Man Toppers: Purchase edible Spider-Man figurines or images printed on rice paper.
- Candy Accents: Use red and blue candy pieces to border the cake or create a mosaic effect.
Decorating your Spider-Man cake is an opportunity to showcase your creativity and attention to detail. Whether you’re a beginner or an experienced baker, these techniques will help you create a show-stopping centerpiece for your celebration.
Tips for a Professional Finish
To elevate your Spider-Man cake from impressive to extraordinary, applying a professional touch is essential. This section offers advanced tips and techniques for achieving a polished look that rivals bakery-quality creations.
Achieving Clean Edges
Clean edges add to the overall appeal of your cake, ensuring it looks neat and well-executed.
Using a Bench Scraper
- Apply a generous amount of frosting to the cake.
- Use a bench scraper or offset spatula to smooth the frosting while rotating the cake on a turntable.
- Chill the cake for 15 minutes and repeat for a flawless finish.
Fondant Smoothing
- Roll out the fondant evenly and drape it over the cake.
- Use fondant smoothers to remove air bubbles and ensure a seamless surface.
Adding 3D Elements
3D decorations can transform your cake into a true work of art.
Sculpting with Fondant or Modeling Chocolate
- Shape small pieces of fondant or modeling chocolate into Spider-Man’s emblem, miniature spider-webs, or cityscapes.
- Use edible glue or a small brush dipped in water to attach the elements to the cake.
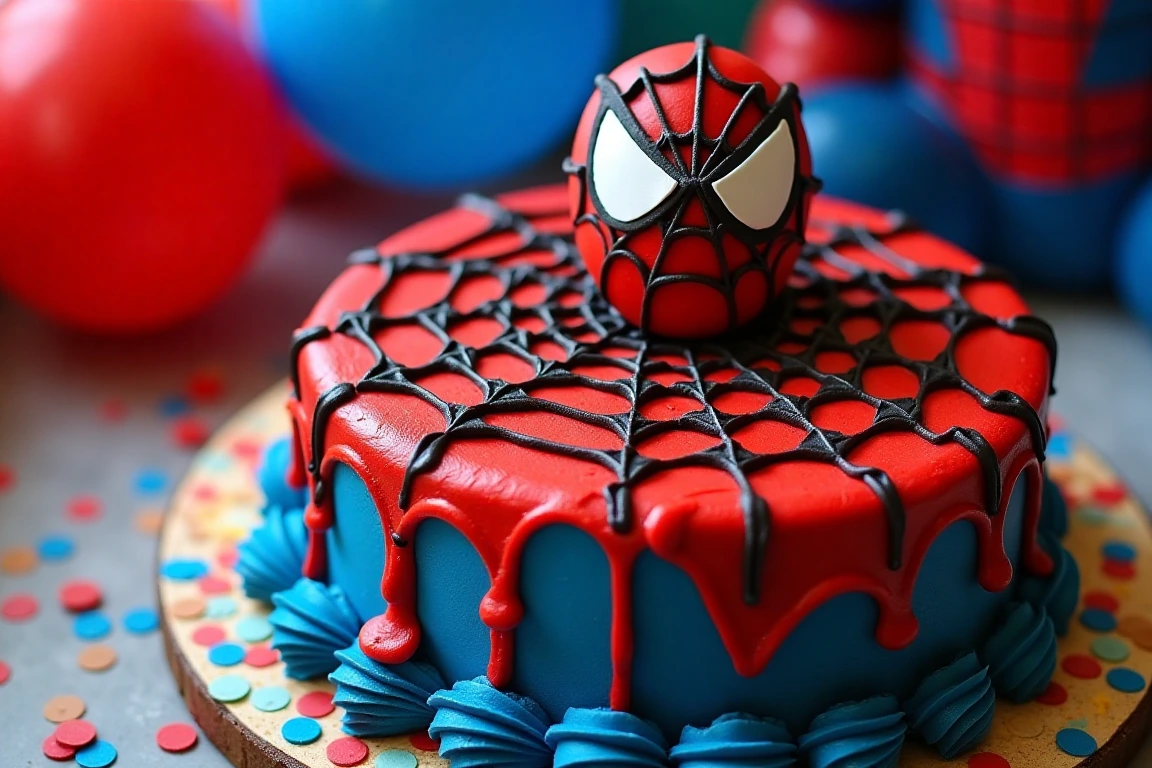
Creating 3D Spider-Man Details
- For a 3D Spider-Man head, mold a smaller cake or rice cereal treat into the desired shape, cover it with fondant, and place it atop the main cake.
- Add intricate webbing and eye details for a realistic effect.
Using Edible Decorations
Edible decorations not only add flair but also keep the cake fully edible.
Pre-Made Toppers
- Purchase pre-made Spider-Man toppers or edible images for a quick and easy decoration.
DIY Edible Accents
- Pipe chocolate spider webs onto wax paper and let them harden before placing them on the cake.
- Use edible glitter or spray to add a superhero shine.
Highlighting with Finishing Touches
Details matter when achieving a professional finish.
Strategic Placement
- Position Spider-Man figurines or edible decorations in dynamic poses.
- Place accents like candy skyscrapers or webbing around the edges for a thematic touch.
Adding a Base Border
- Pipe a border around the base of the cake using a star or round piping tip.
- Use contrasting colors like blue or black to highlight Spider-Man’s theme.
Pro Tips for Presentation
- Use a cake board covered in a matching design, such as a Spider-Man logo or a cityscape.
- Ensure the cake is chilled before transporting to maintain its structure.
By following these tips, your Spider-Man cake will not only look stunning but also stand out as a true centerpiece of any celebration.
If you enjoyed this tutorial, don’t forget to explore other fun cake designs like our Pokémon Cake Ideas and Hello Kitty Cake guides.
For more themed cake inspiration, check out this Princess Cake guide for a royal touch.
FAQs About Spider-Man-Themed Cakes
What is the Theory of Miles’ Two Cakes?
The “Theory of Miles’ Two Cakes” is a concept popularized in online meme culture and discussions, often involving the fictional Spider-Man character Miles Morales. The idea humorously suggests that when faced with two equally desirable options (symbolized by two cakes), one should enjoy both instead of overanalyzing which to choose. While not a literal theory in Spider-Man lore, it reflects a carefree and optimistic attitude that resonates with fans of the character. In the context of a Spider-Man cake, it could inspire creative bakers to try multiple designs or themes instead of limiting themselves to just one!
How to Make Spider Webbing for a Cake
Spider webbing is a crucial element of any Spider-Man cake. Here’s how you can create it:
Using Frosting
Prepare black frosting by using buttercream or royal icing, and add black food coloring until the desired shade is reached. Load a piping bag fitted with a small round tip (size #1 or #2 works well). Start with a small circle in the center of the cake, pipe concentric circles outward, leaving space between each, and connect the circles with curved lines to form the web.
Using Melted Chocolate
Melt dark chocolate and pour it into a piping bag or squeeze bottle. Pipe the web directly onto the cake or onto parchment paper for a raised effect.
Alternative Methods
Use a spider-web stencil and dust the cake with powdered sugar or cocoa powder for a quick design. Stretch melted marshmallows over the cake to mimic a realistic, webbed texture.
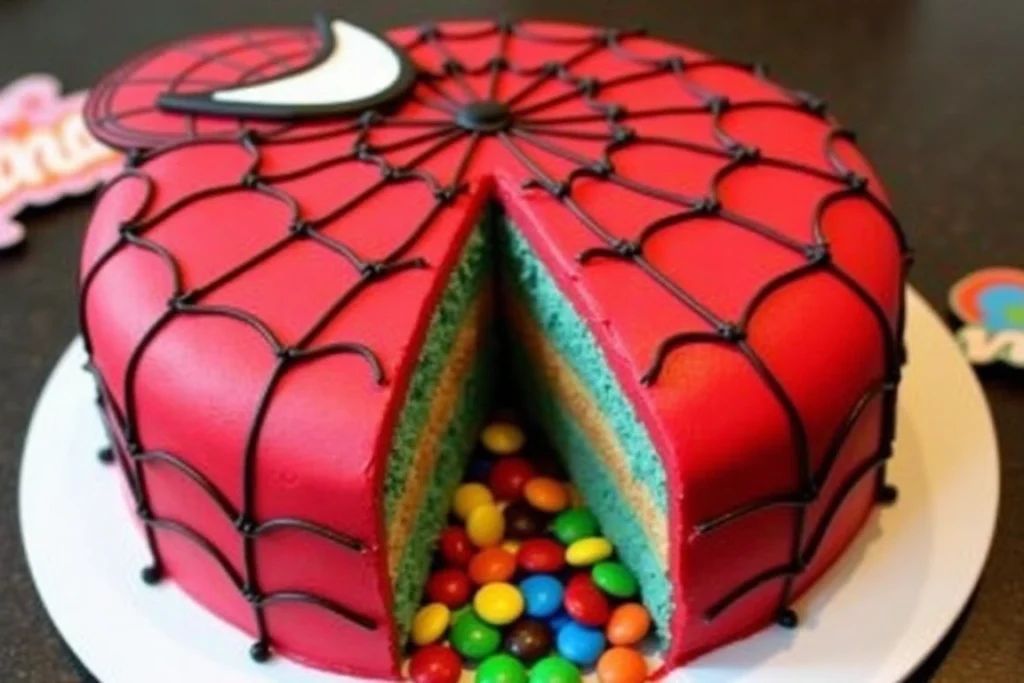
How to Fill a Cake with M&M’s
A cake filled with M&M’s is an exciting surprise for any celebration!
Steps to Fill a Cake with M&M’s
Bake two or more layers of cake. Ensure the layers are cooled and level. Use a round cookie cutter or knife to cut a hole in the middle of each layer except the topmost one. Stack the layers with frosting in between to secure them, aligning the holes. Pour M&M’s into the hollowed-out center, filling it completely. Place the uncut layer on top and frost the entire cake as desired. Finish with Spider-Man-themed decorations or a web design for a superhero surprise!
How to Make a Spider-Man Cake Step by Step
Bake the Cake
Preheat your oven and prepare cake batter using your favorite recipe or mix. Bake the cake in round pans for a Spider-Man face or custom pans for other shapes. Let the cake cool completely before decorating.
Apply the Base Frosting
Frost the entire cake with a red buttercream base, smoothing it evenly. Chill the cake for 15-30 minutes to set the base layer.
Add Webbing and Face Details
Use black frosting in a piping bag to create the web pattern. Start in the center and work outward with circles and curved lines. For Spider-Man’s eyes, cut white fondant into almond shapes and outline them with black frosting. Place them on the cake symmetrically.
Add Finishing Touches
Add edible glitter, Spider-Man toppers, or candy accents for extra flair. Pipe a border around the cake for a polished look.
Conclusion
Creating a Spider-Man cake is a rewarding experience that combines baking skills with creativity. From selecting the perfect design to mastering the decorating techniques, each step contributes to a show-stopping centerpiece that will delight Spider-Man fans of all ages.
Whether you’re a beginner starting with a simple Spider-Man mask or an experienced baker crafting a 3D bust, this guide has provided you with all the tips and techniques needed to bring your superhero-themed cake to life. Don’t be afraid to let your imagination swing high—experiment with bold colors, intricate webbing, and fun edible decorations to make your cake unique.
The key to success lies in preparation, practice, and passion. With patience and attention to detail, your Spider-Man cake will not only look amazing but also taste incredible, leaving your guests impressed and eager for a slice.
Now it’s time to put on your creative cape and start baking. With this guide as your web of knowledge, you’re ready to create a cake worthy of a superhero celebration.
Ultimate Spider-Man Cake – A Heroic Treat for Any Occasion
Equipment
- 2 x 8-inch round cake pans
- Mixing bowls
- Electric mixer
- Measuring cups and spoons
- Spatula
- Rolling Pin
- Offset spatula
- Piping bags
- Round piping tip (#3 or #4 for web design)
- Fondant smoother
- Cake turntable
- Sharp knife or pizza cutter
Ingredients
- For the Cake:
- 2 ½ cups all-purpose flour
- 2 ½ tsp baking powder
- ½ tsp salt
- 1 cup unsalted butter room temperature
- 2 cups granulated sugar
- 4 large eggs
- 1 tbsp vanilla extract
- 1 cup whole milk
- For the Buttercream Frosting:
- 1 cup unsalted butter room temperature
- 4 cups powdered sugar
- 2 tsp vanilla extract
- 3 –4 tbsp heavy cream
- Red and blue gel food coloring
- For the Decoration:
- 1 lb red fondant
- ½ lb blue fondant
- ¼ lb black fondant
- ¼ lb white fondant
- Edible black gel or royal icing for web design
Instructions
- Step 1: Prepare the Cake
- Preheat oven to 350°F (175°C) and grease two 8-inch cake pans with butter and flour.
- In a bowl, whisk together flour, baking powder, and salt.
- In a separate large bowl, cream butter and sugar until light and fluffy.
- Add eggs one at a time, beating well after each addition. Mix in vanilla extract.
- Gradually add dry ingredients to the butter mixture, alternating with milk, starting and ending with dry ingredients.
- Divide the batter evenly between the prepared cake pans and smooth the tops.
- Bake for 30-35 minutes or until a toothpick inserted in the center comes out clean.
- Let the cakes cool in the pans for 10 minutes, then transfer them to a wire rack to cool completely.
- Step 2: Prepare the Buttercream Frosting
- In a large bowl, beat butter until creamy.
- Gradually add powdered sugar, one cup at a time, mixing well.
- Add vanilla extract and heavy cream, beating until smooth and fluffy.
- Divide the frosting into two portions and color one portion red and the other blue using gel food coloring.
- Step 3: Assemble the Cake
- Place one cake layer on a cake stand and spread a layer of red buttercream on top.
- Place the second cake layer on top and cover the entire cake with a thin crumb coat of frosting.
- Chill the cake for 30 minutes to set the frosting.
- Step 4: Cover with Fondant
- Roll out red fondant to cover the entire cake. Smooth it over the cake using a fondant smoother.
- Roll out blue fondant and cut shapes to mimic Spider-Man’s suit design. Attach to the cake using a little water or edible glue.
- Step 5: Create the Spider-Web Design
- Use black edible gel or royal icing to pipe Spider-Man’s webbing design onto the red fondant.
- Roll out white fondant and cut out two large eye shapes. Outline the eyes with black fondant and place them on the cake.
- Step 6: Final Touches
- Use any remaining fondant to add details like Spider-Man’s logo or extra web designs.
- Let the cake sit for at least 1 hour before serving to allow the decorations to set.
Notes
For a chocolate-flavored cake, substitute ½ cup of flour with ½ cup of cocoa powder.
Always use gel food coloring for vibrant colors.
The cake can be made 1 day in advance and stored in the fridge.