
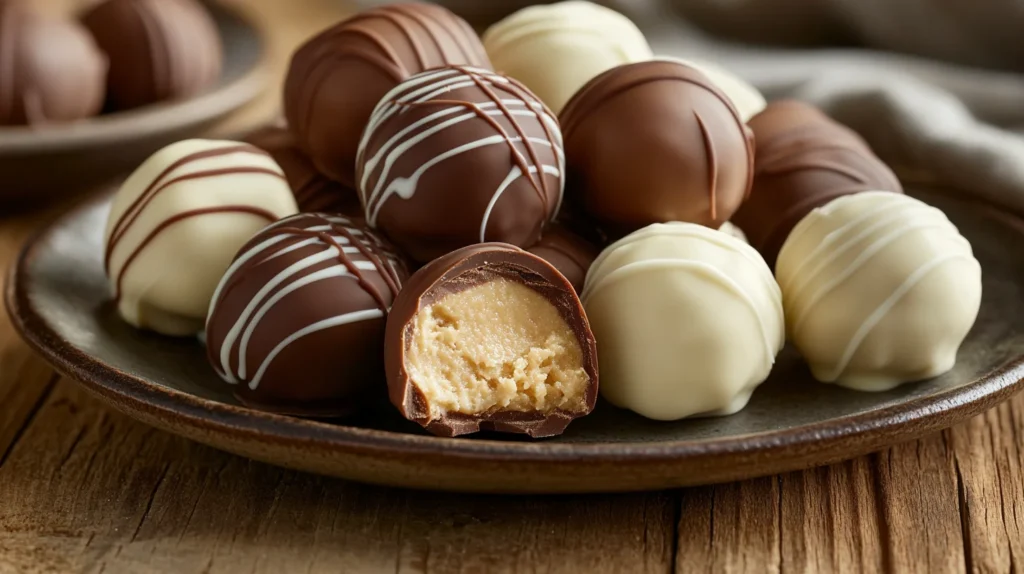
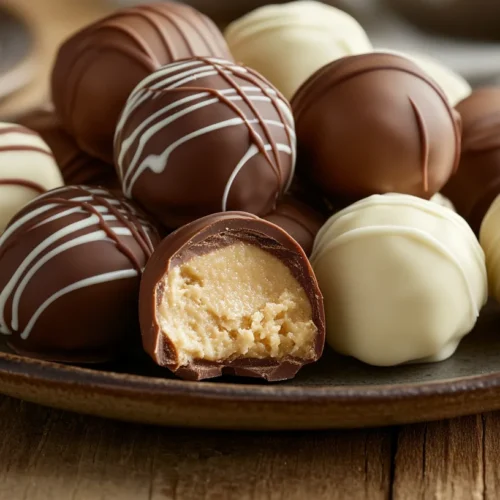
Peanut butter balls are a beloved no-bake treat enjoyed by both kids and adults. These bite-sized delights blend the creamy richness of peanut butter with the smooth, indulgent taste of chocolate, creating a perfect harmony of flavor and texture. Whether you’re making them for a holiday celebration, a party, or simply as a sweet snack, peanut butter balls are easy to prepare and require just a few simple ingredients.
This peanut butter ball recipe is highly adaptable—whether you prefer the traditional version, a healthier alternative, or a festive twist, you can easily customize them to match your preferences. Plus, they store well, making them an excellent make-ahead dessert option.
In this guide, we’ll walk you through everything you need to know about making peanut butter balls, from choosing the best ingredients to perfecting the chocolate coating. Let’s get started and whip up some irresistible peanut butter balls!
Ingredients for Peanut Butter Balls
To make the perfect peanut butter balls, you’ll need just a few simple ingredients. The key to achieving the best texture and flavor is using high-quality ingredients. Below is a breakdown of what you’ll need:
Essential Ingredients:
- Peanut Butter (1 cup) – Smooth or crunchy, depending on your preference. Natural peanut butter can be used but may require adjustments in texture.
- Powdered Sugar (2 cups) – Helps bind the mixture and adds sweetness.
- Butter (½ cup, softened) – Enhances the richness and provides a smooth consistency.
- Vanilla Extract (1 teaspoon) – Adds depth of flavor.
- Salt (¼ teaspoon, optional) – Balances the sweetness and enhances the peanut butter taste.
- Chocolate Chips or Melting Wafers (12 ounces) – Dark, milk, or white chocolate can be used for coating.
Optional Ingredients for Variations:
- Coconut Flakes – Adds texture and a tropical flavor.
- Rice Krispies – Provides a crispy crunch inside the peanut butter balls.
- Chopped Nuts – Almonds, pecans, or walnuts can be mixed into the filling for added crunch.
- Honey or Maple Syrup – A natural sweetener alternative to powdered sugar.
- Protein Powder – For a healthier, high-protein snack.
Now that you have all your ingredients, let’s move on to the tools you’ll need to make the process even easier.
Equipment Needed for Making Peanut Butter Balls
Before you start making peanut butter balls, having the right tools on hand will make the process smoother and more efficient. While this recipe doesn’t require any baking, certain kitchen essentials will help you achieve the best results.
Essential Kitchen Tools:
- Mixing Bowls (2-3 bowls) – One for mixing the peanut butter filling and another for melting the chocolate.
- Hand Mixer or Wooden Spoon – A hand mixer helps blend the peanut butter mixture quickly, but a sturdy wooden spoon can work as well.
- Measuring Cups and Spoons – For accurate ingredient measurements.
- Baking Sheet or Tray – Lined with parchment paper to place the peanut butter balls before dipping.
- Parchment Paper or Wax Paper – Prevents sticking and makes cleanup easier.
- Melting Pot or Microwave-Safe Bowl – For melting the chocolate coating.
- Toothpicks or Forks – Helps dip the peanut butter balls into melted chocolate without making a mess.
- Small Cookie Scoop or Spoon – Ensures even-sized peanut butter balls.
Optional Tools for Convenience:
- Double Boiler – Ideal for melting chocolate evenly without burning it.
- Dipping Tools – Special dipping forks or skewers can make the chocolate-coating process neater.
- Cooling Rack – Helps excess chocolate drip off for a cleaner finish.
With all your ingredients and tools ready, it’s time to start making these delicious treats! Next, we’ll go through a step-by-step guide to creating the perfect peanut butter balls.
Step-by-Step Instructions to Make Peanut Butter Balls
Now that we have all the ingredients and equipment ready, let’s dive into the process of making these delicious peanut butter balls. Follow these simple steps for a foolproof treat every time!
Mixing the Peanut Butter Filling
- Combine the Ingredients – In a large mixing bowl, add the peanut butter, softened butter, powdered sugar, vanilla extract, and salt (if using).
- Mix Until Smooth – Use a hand mixer or a wooden spoon to blend everything until well combined. The mixture should be thick and slightly firm.
- Adjust Texture if Needed – If the dough is too sticky, add a bit more powdered sugar. If too dry, mix in a small amount of melted butter or a teaspoon of milk.
Rolling and Shaping the Balls
- Scoop the Dough – Use a small cookie scoop or spoon to portion out even amounts of the peanut butter mixture.
- Roll Into Balls – Using your hands, roll each portion into a smooth, round ball. Aim for about 1-inch in diameter.
- Place on a Baking Sheet – Line a baking sheet with parchment paper and arrange the peanut butter balls with space between them.
Chilling the Peanut Butter Balls
- Refrigerate for 30 Minutes – Place the tray of peanut butter balls in the refrigerator to firm up. This step is crucial as it helps the balls hold their shape when dipped in chocolate.
- For Faster Chilling – If you’re in a hurry, you can place them in the freezer for about 15 minutes.
Melting the Chocolate
- Use a Microwave – Place chocolate chips or melting wafers in a microwave-safe bowl and heat in 20-second intervals, stirring after each, until smooth.
- Use a Double Boiler – Alternatively, melt the chocolate over a saucepan of simmering water, stirring constantly to prevent burning.
- Thin the Chocolate if Needed – If the chocolate is too thick, stir in a teaspoon of coconut oil or vegetable shortening for a smoother consistency.
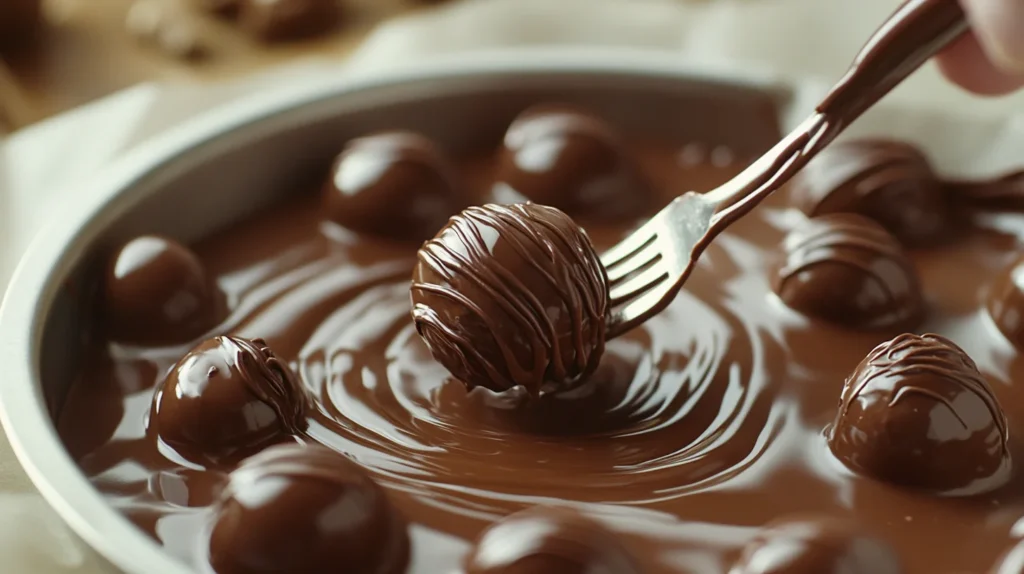
Coating the Peanut Butter Balls in Chocolate
- Dip Each Ball – Using a fork or toothpick, dip each peanut butter ball into the melted chocolate, coating it evenly.
- Remove Excess Chocolate – Gently tap the fork against the bowl to let excess chocolate drip off.
- Place on Parchment Paper – Set the coated peanut butter balls back onto the parchment-lined tray.
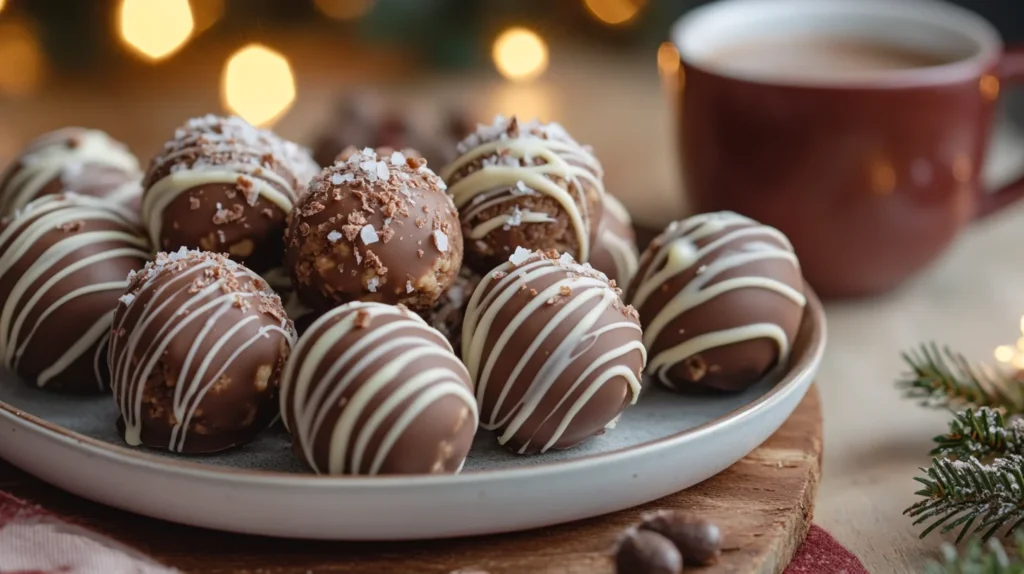
- Decorate if Desired – Sprinkle crushed nuts, sea salt, or drizzle extra melted chocolate on top for added flair.
Final Chilling and Setting
- Refrigerate Until Set – Let the coated peanut butter balls chill for at least 20 minutes until the chocolate hardens.
- Serve and Enjoy! – Once set, the peanut butter balls are ready to enjoy.
Now that you’ve mastered the classic recipe, let’s explore some fun variations and creative twists to customize your peanut butter balls.
Creative Variations of Peanut Butter Balls
While the classic peanut butter balls are delicious on their own, you can easily customize them with different flavors, textures, and dietary adaptations. Here are some fun and creative ways to make your peanut butter balls unique!
Healthy Peanut Butter Balls
If you’re looking for a more nutritious version of peanut butter balls, try these simple swaps:
- Use Natural Peanut Butter – Choose a no-sugar-added peanut butter for a healthier option.
- Replace Powdered Sugar – Use honey, maple syrup, or a sugar substitute like monk fruit sweetener.
- Add Protein Powder – Mixing in a scoop of vanilla or chocolate protein powder makes them a great post-workout snack.
- Use Dark Chocolate – Opt for 70% or higher dark chocolate for a lower-sugar coating.
Crunchy Peanut Butter Balls
For added texture and crunch, mix in one of the following before rolling the balls:
- Rice Krispies – Adds a crispy, airy crunch.
- Crushed Pretzels – A salty-sweet combination that enhances flavor.
- Chopped Nuts – Almonds, pecans, or cashews give a nutty bite.
Holiday-Themed Peanut Butter Balls
Make your peanut butter balls festive by adjusting their appearance for different holidays:
- Christmas: Add red and green sprinkles or drizzle with white chocolate.
- Halloween: Use orange-colored chocolate and black sprinkles for a spooky touch.
- Easter: Shape them into small eggs and coat them in pastel-colored chocolate.
- Valentine’s Day: Drizzle with pink and red icing or add heart-shaped decorations.
Flavored Peanut Butter Balls
Try adding different flavor boosters to the peanut butter mixture:
- Cinnamon or Pumpkin Spice – Perfect for fall-themed peanut butter balls.
- Coconut Extract & Shredded Coconut – A tropical twist on the classic treat.
- Espresso Powder – Adds a hint of coffee flavor for mocha peanut butter balls.
- Mint Extract – Pairs well with dark chocolate for a refreshing taste.
Now that you have some delicious variations to try, let’s go over the best storage tips to keep your peanut butter balls fresh and tasty for longer.
Storage Tips for Peanut Butter Balls
To keep your peanut butter balls fresh and delicious, proper storage is essential. Whether you plan to enjoy them within a few days or save them for later, here are the best ways to store them.
Refrigeration vs. Freezing: What’s Best?
- Refrigeration (Best for Short-Term Storage)
- Store peanut butter balls in an airtight container.
- Place parchment paper between layers.
- Keep them in the fridge for 2 weeks.
- Freezing (Best for Long-Term Storage)
- Arrange peanut butter balls in a single layer on a baking sheet and freeze for 1 hour.
- Transfer to a freezer-safe container or ziplock bag.
- When ready to eat, thaw them in the fridge for a few hours before serving.
How Long Do Peanut Butter Balls Last?
- At Room Temperature – Best consumed within 2 days if kept in a cool, dry place.
- In the Refrigerator – Stay fresh for up to 2 weeks.
- In the Freezer – Maintain quality for up to 3 months.
Tips to Keep Peanut Butter Balls Fresh
- Avoid Humidity – Store in a dry place to prevent chocolate from becoming sticky.
- Use an Airtight Container – Prevents moisture and odors from affecting the taste.
- Keep Away from Heat – Chocolate can melt if stored near a warm area.
Now that you know how to store them, let’s answer some frequently asked questions about peanut butter balls.
More Sweet Treats to Try
If you enjoyed these peanut butter balls, you’ll love:
- Brownie Cookies – A rich and fudgy twist on classic cookies.
- S’mores Cookies – Perfect for campfire vibes without the fire.
- Mini Apple Pies – A delightful, handheld treat for any season.
FAQs About Peanut Butter Balls
What Do I Need to Make Peanut Butter Balls?
To make peanut butter balls, you need a few simple ingredients:
- Peanut Butter (1 cup) – Creamy or crunchy, depending on your preference.
- Powdered Sugar (2 cups) – Helps bind the mixture and adds sweetness.
- Butter (½ cup, softened) – Adds richness and helps with texture.
- Vanilla Extract (1 teaspoon) – Enhances flavor.
- Salt (¼ teaspoon, optional) – Balances sweetness and enhances taste.
- Chocolate Chips or Melting Wafers (12 ounces) – Dark, milk, or white chocolate for coating.
- Optional Add-ins: Coconut flakes, Rice Krispies, chopped nuts, or honey for variations.
Why Are My Peanut Butter Balls So Dry?
If your peanut butter balls are dry and crumbly, here are a few possible reasons and fixes:
- Too Much Powdered Sugar – Reduce the amount slightly or add more peanut butter to soften the mixture.
- Not Enough Butter – Butter helps with moisture; add a little more softened butter to fix the texture.
- Using Natural Peanut Butter – Some natural peanut butters are drier. Mix in a teaspoon of honey or a little melted butter for better consistency.
Do Peanut Butter Balls Need to Be Refrigerated?
Yes, peanut butter balls should be refrigerated for best results:
- Before Coating in Chocolate – Chill for at least 30 minutes to firm up and prevent them from falling apart.
- After Making Them – Store in an airtight container in the fridge for up to 2 weeks to maintain freshness.
- For Longer Storage – Freeze them for up to 3 months and thaw before eating.
Why Are My Peanut Butter Balls Too Sticky?
If your peanut butter balls are too sticky, try these fixes:
- Add More Powdered Sugar – A little at a time until the dough firms up.
- Chill the Mixture – Refrigerate the peanut butter mixture for 20–30 minutes before rolling into balls.
- Use Less Butter or Peanut Butter – If the mixture feels greasy, reduce the butter or switch to a less oily peanut butter.
Conclusion
Peanut butter balls recipe is the perfect way to enjoy a combination of creamy, sweet, and chocolatey goodness. These bite-sized treats are incredibly easy to make, require no baking, and can be customized in countless ways to suit your taste. Whether you stick to the classic peanut butter balls recipe, add a crunchy twist, or experiment with holiday-themed decorations, they are always a hit.
With proper storage, your peanut butter balls recipe can last for weeks or even months, making them ideal for meal prep, gifting, or satisfying a sweet tooth whenever a craving strikes. Plus, with healthy and high-protein variations, you can easily adapt this peanut butter balls recipe to fit different dietary needs.
Now it’s your turn to try this easy peanut butter balls recipe! Gather your ingredients, follow the steps, and enjoy these irresistible homemade treats. Whether you’re making them for a party, holiday gathering, or just a snack for yourself, this peanut butter balls recipe is sure to become a favorite.
Happy snacking! 😊
Easy Peanut Butter Balls Recipe – No-Bake Chocolate-Coated Treats
Equipment
- Mixing Bowls (for combining ingredients)
- Hand Mixer or Wooden Spoon (for blending the peanut butter mixture)
- Measuring Cups and Spoons (for accurate ingredient portions)
- Baking Sheet or Tray (lined with parchment paper)
- Parchment Paper or Wax Paper (to prevent sticking)
- Small Cookie Scoop or Spoon (for uniform peanut butter balls)
- Microwave-Safe Bowl or Double Boiler (for melting chocolate)
- Fork or Toothpicks (for dipping balls in chocolate)
Ingredients
- For the Peanut Butter Filling:
- 1 cup peanut butter creamy or crunchy
- 2 cups powdered sugar
- ½ cup unsalted butter softened
- 1 teaspoon vanilla extract
- ¼ teaspoon salt optional
- For the Chocolate Coating:
- 12 ounces semi-sweet or dark chocolate chips or melting wafers
- 1 teaspoon coconut oil optional, for smooth melting
- Optional Add-Ins:
- ½ cup crushed nuts almonds, pecans, or walnuts
- ½ cup shredded coconut
- ½ cup Rice Krispies for extra crunch
- 1 tablespoon honey or maple syrup for natural sweetness
Instructions
- Step 1: Make the Peanut Butter Mixture
- In a large mixing bowl, combine peanut butter, butter, powdered sugar, vanilla extract, and salt.
- Mix with a hand mixer or wooden spoon until a thick, dough-like consistency forms.
- If the mixture is too soft, chill in the refrigerator for 15–20 minutes before rolling.
- Step 2: Shape the Peanut Butter Balls
- Use a small cookie scoop or spoon to scoop equal portions of the mixture.
- Roll each portion into smooth, round balls using your hands.
- Place the balls on a parchment-lined baking sheet.
- Step 3: Chill the Peanut Butter Balls
- Refrigerate the balls for at least 30 minutes or freeze for 15 minutes to firm up.
- This step helps prevent them from falling apart when dipping in chocolate.
- Step 4: Melt the Chocolate
- In a microwave-safe bowl, melt chocolate chips in 20-second intervals, stirring between each until smooth.
- Alternatively, use a double boiler to melt the chocolate slowly over simmering water.
- If the chocolate is too thick, stir in 1 teaspoon of coconut oil for a smoother consistency.
- Step 5: Coat the Peanut Butter Balls in Chocolate
- Using a fork or toothpick, dip each chilled peanut butter ball into the melted chocolate, coating evenly.
- Let excess chocolate drip off before placing the coated balls back on the parchment-lined tray.
- If desired, drizzle with additional melted chocolate or sprinkle with crushed nuts.
- Step 6: Chill and Set
- Refrigerate the chocolate-covered peanut butter balls for at least 20 minutes until the chocolate hardens.
- Serve and enjoy!
Notes
Dietary Adjustments: Use almond butter or sunflower seed butter for a peanut-free version. Swap sugar-free chocolate for a low-carb option.
Texture Tip: For a crunchier texture, add Rice Krispies or chopped nuts to the filling.