
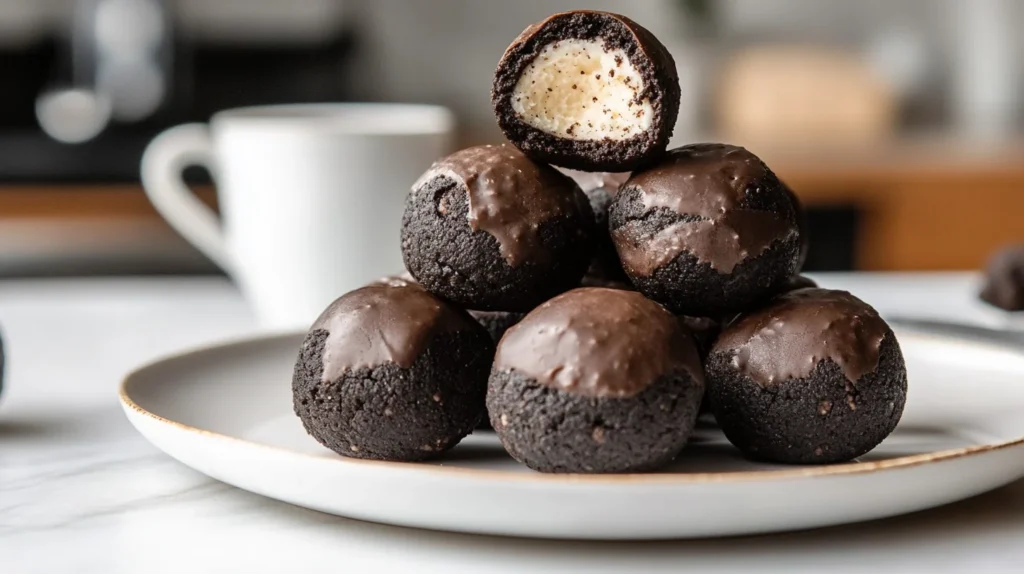
The Oreo Balls Recipe is a simple, no-bake dessert that’s ideal for any occasion. With just a few basic ingredients—Oreos, cream cheese, and chocolate—you can create a rich, indulgent treat that’s sure to be a crowd-pleaser. Whether you’re preparing these Oreo balls for a party, holiday gathering, or just to satisfy a sweet tooth, they’re always a favorite.
One of the best aspects of this Oreo Balls Recipe is its versatility. You can personalize them with different coatings, decorations, and flavors to match your preferences. Plus, since they require no baking, they come together quickly and are perfect for beginner bakers.
In this guide, we’ll walk you through everything you need to know to make the perfect Oreo Balls Recipe, including variations, expert tips, and answers to common questions.

Ingredients & Equipment Needed
Before making delicious Oreo balls, you’ll need to gather a few simple ingredients and kitchen tools.
Ingredients:
- 1 package (14.3 oz) of Oreo cookies – Any variety works, but classic chocolate Oreos are the most popular.
- 1 block (8 oz) of cream cheese, softened – Full-fat or reduced-fat both work well.
- 2 cups of melting chocolate – You can use semi-sweet, milk, dark, or white chocolate.
- Optional toppings:
- Sprinkles
- Crushed Oreos
- Drizzled chocolate
- Chopped nuts
Equipment Needed:
- Food processor or rolling pin & plastic bag – To crush the Oreos into fine crumbs.
- Mixing bowl & spoon – To blend the cream cheese with the crushed Oreos.
- Baking sheet lined with parchment paper – To place the Oreo balls before freezing.
- Forks or dipping tools – To coat the Oreo balls evenly in chocolate.
- Microwave-safe bowl or double boiler – To melt the chocolate for dipping.
Ingredient Substitutions & Variations
- Dairy-Free Version: Use dairy-free cream cheese and vegan chocolate.
- Flavored Oreos: Try Golden Oreos, Peanut Butter Oreos, or Mint Oreos for unique flavors.
- Coating Options: Instead of chocolate, roll the balls in cocoa powder, crushed nuts, or shredded coconut.
Now that we have everything ready, let’s move on to the step-by-step process of making Oreo balls.
Step-by-Step Guide to Making Oreo Balls
Now that we have all the ingredients and tools ready, let’s go through the step-by-step process of making these delicious Oreo balls.
Crush the Oreos
- If using a food processor, pulse the entire package of Oreos (including the cream filling) until you get fine crumbs.
- If you don’t have a food processor, place the Oreos in a ziplock bag and crush them using a rolling pin until they turn into fine crumbs.
Tip: The finer the crumbs, the smoother your Oreo balls will be.
Mix with Cream Cheese
- Transfer the Oreo crumbs to a large mixing bowl.
- Add the softened cream cheese and mix until fully combined. You can use:
- A spoon
- A hand mixer
- Your hands (messy but effective!)
Tip: The dough should have a soft, moldable texture similar to cookie dough.
Form the Balls
- Scoop out about 1 tablespoon of the mixture and roll it into a smooth ball using your hands.
- Place each ball onto a parchment-lined baking sheet.
- Repeat until all the mixture is used up (you should get 25–30 balls).
Tip: If the dough is too sticky, refrigerate it for 10 minutes before rolling.
Chill the Oreo Balls
- Place the tray of Oreo balls in the freezer for 20–30 minutes.
- This helps them firm up, making them easier to dip in chocolate.
Melt the Chocolate
- In a microwave-safe bowl, heat the melting chocolate in 30-second intervals, stirring between each, until smooth.
- Alternatively, melt the chocolate in a double boiler over low heat.
Tip: If the chocolate is too thick, add ½ teaspoon of coconut oil or shortening to thin it out.
Dip the Oreo Balls in Chocolate
- Using a fork or dipping tool, dip each Oreo ball into the melted chocolate, covering it completely.
- Let the excess chocolate drip off, then place the coated ball back on the parchment paper.
Tip: For a professional look, tap the fork against the bowl to remove excess chocolate before placing the ball down.
Decorate (Optional)
While the chocolate is still wet, sprinkle on toppings like:
Crushed Oreos
Sprinkles
Chopped nuts
Drizzled white or dark chocolate
Chill & Serve
- Place the dipped Oreo balls back in the refrigerator for 30 minutes or until the chocolate hardens.
- Once set, they’re ready to enjoy!
Storage Tip: Store Oreo balls in an airtight container in the fridge for up to 1 week, or freeze them for up to 3 months.
Variations of Oreo Balls
Oreo balls are incredibly versatile, and you can easily customize them with different flavors, coatings, and decorations. Here are some fun variations to try!

1. White Chocolate Oreo Balls
Instead of dipping the Oreo balls in regular chocolate, use white chocolate for a creamy, vanilla-like taste.
- Follow the same steps as the classic recipe.
- Melt white chocolate and dip the Oreo balls in it.
- Decorate with dark chocolate drizzle or colored sprinkles for a fun look.
Tip: Add a pinch of vanilla extract to the white chocolate for extra flavor.
2. Peanut Butter Oreo Balls
For a rich and nutty twist, add peanut butter!
- Use Peanut Butter Oreos or classic Oreos.
- Mix 2 tablespoons of peanut butter into the Oreo-cream cheese mixture.
- Coat in milk chocolate and top with crushed peanuts or a peanut butter drizzle.
Tip: Swap peanut butter for almond butter or Nutella for a different flavor.
3. Mint Chocolate Oreo Balls
If you love mint and chocolate together, try this refreshing version!
- Use Mint Oreos instead of classic Oreos.
- Add ½ teaspoon of peppermint extract to the mixture for a stronger minty flavor.
- Dip in dark chocolate and sprinkle with crushed peppermint candies or green sprinkles.
Tip: Mint and white chocolate also pair well together! Try dipping in white chocolate for a cool contrast.
4. Holiday-Themed Oreo Balls
Make Oreo balls festive by decorating them for different holidays!
- Christmas: Use red and green sprinkles or drizzle with red and white chocolate.
- Halloween: Dip in orange-colored white chocolate and add candy eyes for a spooky effect.
- Valentine’s Day: Use pink and red sprinkles or drizzle with strawberry-flavored chocolate.
- Easter: Dip in pastel-colored chocolate and top with mini egg candies.
Tip: Use colored candy melts to match any holiday theme!
Tips & Tricks for the Best Oreo Balls
To make sure your Oreo balls turn out perfectly every time, here are some expert tips and tricks for the best texture, coating, and presentation.
1. Choosing the Right Chocolate
- Use high-quality melting chocolate (such as Ghirardelli or candy melts) for a smooth and glossy finish.
- Avoid using chocolate chips, as they don’t melt as smoothly and can be too thick.
- If your melted chocolate is too thick, add ½ teaspoon of coconut oil or shortening to thin it out.
Pro Tip: For an extra rich taste, use a mix of milk and dark chocolate for the coating.
2. How to Achieve a Smooth Chocolate Coating
- Make sure the Oreo balls are chilled before dipping. If they are too soft, they may fall apart in the chocolate.
- Use a fork or dipping tool to coat each ball evenly.
- For a clean finish, tap the fork gently on the side of the bowl to remove extra chocolate.
Pro Tip: If chocolate pools around the base of the Oreo balls, transfer them to a new sheet of parchment paper before they fully set.
3. Storing & Freezing Oreo Balls
- Refrigerator Storage: Store Oreo balls in an airtight container in the fridge for up to 1 week.
- Freezer Storage: Freeze them for up to 3 months in a sealed container. Let them thaw in the fridge for about 15 minutes before serving.
- Avoid condensation: If freezing, store Oreo balls in layers separated by parchment paper to prevent them from sticking together.
Pro Tip: If making Oreo balls for an event, make them ahead of time and store them in the fridge or freezer until needed!
4. Adding Extra Flavor & Texture
- Mix in flavored extracts like vanilla, almond, or peppermint for a unique twist.
- Add a pinch of sea salt to balance the sweetness.
- Roll the Oreo balls in crushed cookies, cocoa powder, or shredded coconut instead of dipping them in chocolate.
Pro Tip: If adding drizzles or sprinkles, do so immediately after dipping while the chocolate is still wet so they stick better.
5. Making Oreo Balls Without Cream Cheese
- If you don’t have cream cheese or want a different texture, try these substitutes:
Nut Butter: Peanut butter, almond butter, or cashew butter for a nutty flavor.
Sweetened Condensed Milk: Adds sweetness and moisture.
Mashed Bananas or Greek Yogurt: For a slightly healthier version.
Pro Tip: The texture may change depending on the substitute, so adjust the amount accordingly.
More Easy Desserts to Try
If you love this Oreo Balls recipe, be sure to check out our Oreo Mug Cake Recipe – Quick and Easy 5-Minute Dessert for another delicious way to enjoy Oreos in minutes!
For chocolate lovers, our Double Chocolate Chip Cookies Recipe – Rich and Chewy Treats is a must-try.
No matter your sweet tooth cravings, there’s always a Cherry Cheesecake Recipe – Ultimate Guide to a Creamy and Easy Dessert waiting to be made!
FAQs About Oreo Balls
What is the easiest way to dip Oreo balls?
The easiest way to dip Oreo balls in chocolate is to use a fork or dipping tool:
- Drop the Oreo ball into the melted chocolate.
- Use a fork to gently roll it around, ensuring full coverage.
- Lift the ball with the fork and tap it lightly against the side of the bowl to remove excess chocolate.
- Slide the coated ball onto parchment paper using a toothpick or another fork.
Pro Tip: If the chocolate is too thick, add ½ teaspoon of coconut oil or shortening to make it smoother for dipping.
Why are my Oreo balls falling apart?
If your Oreo balls are crumbling or falling apart, it could be due to:
- Not enough cream cheese: The mixture needs enough moisture to hold together. Try adding a little more softened cream cheese.
- Over-processing the Oreos: If the crumbs are too fine and dry, they may not bind well.
- Not chilling before dipping: Always freeze Oreo balls for at least 20–30 minutes before dipping to help them hold their shape.
Fix: If your mixture is still too dry, add a small amount of milk or melted chocolate to help it bind better.
Do Oreo balls need to be refrigerated?
Yes! Oreo balls should be stored in the refrigerator because they contain cream cheese, which can spoil at room temperature.
- Refrigerate in an airtight container for up to 1 week.
- Freeze for up to 3 months if you want to make them ahead of time.
Tip: If serving Oreo balls at a party, keep them chilled until just before serving to maintain their texture.
Why are my Oreo balls greasy?
Oreo balls can become greasy if:
- The cream cheese is too warm, causing it to release excess moisture.
- Over-mixing the dough makes it too soft and sticky.
- The chocolate is overheated, leading to oil separation.
Fix: Refrigerate the mixture before rolling and make sure to use softened, not melted, cream cheese. If the balls are greasy after rolling, chill them longer before dipping.
Conclusion
Oreo balls are a simple, delicious, and no-bake treat that anyone can make with just a few ingredients. Whether you’re making this Oreo Balls Recipe for a party, holiday, or just to satisfy your sweet tooth, they’re always a crowd-pleaser.
The best part? Oreo balls are highly customizable! You can experiment with different flavors, coatings, and decorations to match any occasion. From classic chocolate-dipped Oreo balls to fun variations like peanut butter, mint, or white chocolate, there’s an option for everyone.
By following this Oreo Balls Recipe, along with expert tips and troubleshooting advice in this article, you’ll be able to make perfectly smooth, rich, and flavorful Oreo balls every time.
Now It’s Your Turn!
Try making this easy Oreo Balls Recipe at home and share them with family and friends. Have fun experimenting with different flavors and decorations!
If you have any questions or want to share your own creative Oreo ball ideas, feel free to drop them in the comments. Happy baking! 🎉🍫

Easy No-Bake Oreo Balls Recipe (Only 3 Ingredients!)
Equipment
- Food processor (or ziplock bag & rolling pin)
- Mixing bowl
- Spoon or spatula
- Baking sheet
- Parchment paper
- Fork or dipping tool
- Microwave-safe bowl or double boiler
Ingredients
- ✔️ 1 package 14.3 oz of Oreo cookies (about 36 cookies)
- ✔️ 1 block 8 oz of cream cheese, softened
- ✔️ 2 cups of melting chocolate semi-sweet, milk, dark, or white chocolate
- ✔️ Optional toppings:
- Sprinkles
- Crushed Oreos
- Drizzled chocolate
- Chopped nuts
Instructions
- Crush the Oreos
- In a food processor, pulse the Oreos (cream filling included) until fine crumbs form.
- No processor? Place Oreos in a ziplock bag and crush them with a rolling pin.
- Mix with Cream Cheese
- Transfer Oreo crumbs to a mixing bowl.
- Add softened cream cheese and mix until well combined. The mixture should be moldable.
- Form the Balls
- Scoop about 1 tablespoon of the mixture and roll into a smooth ball.
- Place each ball on a parchment-lined baking sheet.
- Repeat until all the mixture is used (about 25–30 balls).
- Chill the Oreo Balls
- Freeze the tray for 20–30 minutes to firm up.
- Melt the Chocolate
- In a microwave-safe bowl, heat the chocolate in 30-second intervals, stirring each time, until smooth.
- Or, use a double boiler over low heat.
- Dip the Oreo Balls in Chocolate
- Use a fork to dip each Oreo ball into melted chocolate.
- Let excess chocolate drip off, then place back on parchment paper.
- Decorate (Optional)
- While the chocolate is still wet, sprinkle toppings like:
- ✔️ Crushed Oreos
- ✔️ Sprinkles
- ✔️ Chopped nuts
- ✔️ Drizzled white or dark chocolate
- Chill & Serve
- Refrigerate for 30 minutes or until the chocolate hardens.
- Enjoy immediately or store in an airtight container.
Notes
✔️ Variations: Try Mint Oreos, Peanut Butter Oreos, or Golden Oreos for different flavors.
✔️ Chocolate Tip: Add ½ teaspoon of coconut oil to melted chocolate for smoother dipping.
✔️ Dairy-Free Option: Use dairy-free cream cheese and vegan chocolate.